Thursday, October 4, 2012

Tutorial : การใช้งาน DWR เบื้องต้น

,
สำหรับ DWR(Direct Web Remoting) เป็น Java library ที่ทำการ Convert Service ของ Java ไปเป็น JavaScript ทำให้ในฝั่งของ JavaScript สามารถเรียกใช้ method ใน class java ได้โดยตรง คำอธิบายสั้นๆจาก เว็บไซต์ DWR
1DWR is a Java library that enables Java on the server and JavaScript in a browser to interact and call each other as simply as possible.
2 
3DWR is Easy Ajax for Java
สำหรับการทำงานโดยคร่าวๆเป็นดังภาพ
หรืออ่านแบบเต็มๆได้จาก DWR: Easy AJAX for JAVA
เครื่องไม้เครื่องมือที่ใช้
1. Windows XP Professional SP3
2. DWR Library Version 2.0.5
3. Eclipse IDE 3.5
4. Tomcat 6.0.18
ขั้นตอนในการพัฒนา
0. ขอข้ามขั้นตอนการติดตั้ง Tomcat , การ Download Eclipse ซึ่งคิดว่าน่าจะติดตั้งกันเป็นอยู่
1. ทำการ Download DWR จากเว็บ http://directwebremoting.org/dwr/download.html Downlaod เฉพาะ .jar มา

2. เปิด Eclipse ขึ้นมาแล้วสร้าง Dynamic Web Project ขึ้นมาตามภาพเลยครับ


3. จากนั้น copy dwr.jar,commons-logging-xx.jar (Download จาก http://commons.apache.org/logging/) ใน WEB-INF/lib ของ Web Application
4. เปิด /WEB-INF/web.xml และเพิ่ม Servlet ดังนี้
1<servlet>
2   <display-name>DWR Ajax</display-name>
3   <servlet-name>dwr-invoker</servlet-name>
4   <servlet-class>org.directwebremoting.servlet.DwrServlet</servlet-class>
5   <init-param>
6      <param-name>debug</param-name>
7      <param-value>true</param-value>
8   </init-param>
9   <load-on-startup>1</load-on-startup>
10</servlet>
11<servlet-mapping>
12   <servlet-name>dwr-invoker</servlet-name>
13   <url-pattern>/dwr/*</url-pattern>
14</servlet-mapping>
6. สร้าง Class ขึ้นมาสอง Class ในที่นี้ขอใช้ตัวอย่าง ในการดึงข้อมูล Customer จากฝั่ง Java มาแสดง (ไม่ติดต่อ Database) ดังนั้นผมจะสร้าง Class มาดังนี้
- Customer.java


พิมพ์ Code ดังรูป แล้วคลิกขวา


Code ที่เสร็จแล้วจะเป็นดังนี้
1package com.fun4station.model;
2 
3public class Customer {
4   private int id;
5   private String name;
6   private String address;
7 
8   public int getId() {
9      return id;
10   }
11 
12   public void setId(int id) {
13      this.id = id;
14   }
15 
16   public String getName() {
17      return name;
18   }
19 
20   public void setName(String name) {
21      this.name = name;
22   }
23 
24   public String getAddress() {
25      return address;
26   }
27 
28   public void setAddress(String address) {
29      this.address = address;
30   }
31 
32}
- CustomerService.java ทำเช่นเดียวกับ Customer.java แต่เราจะเขียน Code เองดังนี้
1package com.fun4station.service;
2import com.fun4station.model.Customer;
3 
4public class CustomerService {
5 
6   /**
7    * Example service for return bean
8    * @param id
9    * @return
10    */
11   public Customer getCustomer(int id){
12      Customer cust = new Customer();
13      cust.setId(id);
14      cust.setName("Customer Name");
15      cust.setAddress("Example Address");
16       
17      return cust;
18   }
19    
20   /**
21    * Example service for return String
22    * @return
23    */
24   public String getServiceName(){
25      return "CustomerService";
26   }
27}
7. สร้าง file ชื่อ dwr.xml ใน WEB-INF เพื่อใช้ในการ Configuration CustomerService.java, Customer.java ดังนี้
1<?xml version="1.0" encoding="UTF-8"?>
2<!DOCTYPE dwr PUBLIC
3    "-//GetAhead Limited//DTD Direct Web Remoting 2.0//EN"
5<dwr>
6  <allow>
7   <convert converter="bean" match="com.fun4station.model.Customer" />
8    <create creator="new" javascript="CustomerService">
9      <param name="class" value="com.fun4station.service.CustomerService"/>
10    </create>
11  </allow>
12</dwr>
ส่วนสำคัญที่ต้องดูคือ
1<convert converter="bean" match="com.fun4station.model.Customer" />
เป็นการบอกให้ DWR Framework ทำการ convert class com.fun4station.model.Customer ไปเป็น bean ซึ่งสามารถเรียกใช้ได้เหมือน Object หนึ่ง ใน JavaScript
และ
1<create creator="new" javascript="CustomerService">
2   <param name="class" value="com.fun4station.service.CustomerService"/>
3</create>
เป็นการสร้าง JavaScript ชื่อ CustomerService(ชื่อนี้จะถูกเรียกใช้ในหน้า JSP โดย JavaScript) จาก class com.fun4station.service.CustomerService
8. เมื่อเสร็จแล้วจะได้โครงสร้าง Project ดังรูป


10. Start Web Server

11. เปิด Browser ขึ้นมาแล้วพิมพ์ http://localhost:port/DWRWeb/dwr ถ้าไม่มีข้อผิดพลาดจะได้หน้าจอดังนี้

12. Click CustomerService เพื่อ Test

13. กรอกข้อมูลหมายเลขลงในช่อง getCustomer แล้วกดปุ่ม Execute ถ้าไม่ผิดพลาดอะไรจะได้ Message ดังรูป

สำหรับการนำไปใช้ ก็ตามนี้เลยครับ
1To use this class in your javascript you will need the following script includes:
2  <script type='text/javascript' src='/DWRWeb/dwr/interface/CustomerService.js'></script>
3  <script type='text/javascript' src='/DWRWeb/dwr/engine.js'></script>
4In addition there is an optional utility script:
5  <script type='text/javascript' src='/DWRWeb/dwr/util.js'></script>
14. สร้าง File index.jsp ขึ้นมาใน path WebContent จากนั้นเขียน Code ดังนี้
1<?xml version="1.0" encoding="UTF-8" ?>
2<%@ page language="java" contentType="text/html; charset=UTF-8" pageEncoding="UTF-8"%>
3<!DOCTYPE html PUBLIC "-//W3C//DTD XHTML 1.0 Transitional//EN" "http://www.w3.org/TR/xhtml1/DTD/xhtml1-transitional.dtd">
5<head>
6<meta http-equiv="Content-Type" content="text/html; charset=UTF-8" />
7<title>Example DWR</title>
8<script type='text/javascript' src='/DWRWeb/dwr/engine.js'></script>
9<script type='text/javascript' src='/DWRWeb/dwr/util.js'></script>
10<script type='text/javascript' src='/DWRWeb/dwr/interface/CustomerService.js'></script>
11 
12<script type='text/javascript'>
13function getCustomerData(){
14   var id = DWRUtil.getValue('customerId');
15   CustomerService.getCustomer(id, function(data){
16      DWRUtil.setValue("display_data",data.id+" - "+data.name+ " - "+data.address);
17   });
18}
19</script>
20</head>
21<body>
22Input Id : <input type="text" name="customerId" id="customerId" />
23<input type="button" value="GetCustomer" onclick="getCustomerData();" /><br/>
24<p id="display_data"></p>
25</body>
26</html>
ข้อสำคัญที่ควรจำคือ ต้องเรียกใช้ JavaScript
1<script type='text/javascript' src='/DWRWeb/dwr/engine.js'></script>
สำหรับ util.js แล้วแต่ว่าจะใช้หรือไม่ และที่สำคัญที่สุดคือ การเรียกใช้ JavaScript ที่ Convert มาจาก Java
1<script type='text/javascript' src='/DWRWeb/dwr/interface/CustomerService.js'></script>
สังเกตว่า Server ที่เป็น JavaScript ที่ทำการ convert มานั้นจะอยู่ใน /interface/ชื่อ Service ที่ตั้งใน dwr.xml
15. ทดลอง Run ตัวอย่างโดยเปิด Browser ไปที่ http://localhost:port/DWRWeb/ จะได้หน้าจอดังรูป

เมื่อลองกรอกข้อมูล จะได้ผลลัพท์ ดังนี้

จากตัวอย่างจะเป็นการ Config และใช้งานอย่างง่ายๆตามตัวอย่างจากเว็บ DWR ซึ่งสามารถอ่านและทำตามได้ หรือ จะอ่านเพิ่มเติมจากเว็บ ของ DWR เองเลยก็ได้
Code ตัวอย่าง
ข้อมูลจาก
Direct Web Remoting

Servlet และ JSP ใครสนใจเอาไปอ่านได้เลย

,

Servlet และ JSP ใครสนใจเอาไปอ่านได้เลย

06 พ.ค.
หลาย ปีมาแล้ว นั่งเขียนเอกสารการสอนอยู่ชุดหนึ่ง หลังจากที่พอมีทักษะการด้านการใช้งานภาษาจาวาเรียบร้อยแล้ว ก็หันมาสนใจในการสร้างโปรแกรม ที่ทำงานในส่วนเซิร์ฟเวอร์บ้าง ซึ่งตามสภาพแวดล้อมการทำงาน ของภาษาจาวา ก็คือการสร้างรูปแบบการประมวลผล ที่เรียกว่า จาวาเซิร์ฟเล็ต (Java Servlet) เรียกย่อๆไม่เปลืองคำพูดว่า เซิร์ฟเล็ต และเจเอสพี (JSP: Java Server Page) ทั้งสองแบบเป็นการประมวลผลโปรแกรม บนเว็บเซิร์ฟเวอร์ แล้วส่งผลลัพธ์กลับสู่ผู้ใช้ผ่านอินเตอร์เน็ตบนพื้นฐานของเว็บ โดยใช้โปรโตคอลการสื่อสารมาตรฐาน HTTP แม้ว่าสภาพการทำงานและการใช้งานจะเหมือนกัน แต่ทั้งสองก็ต่างกันที่เซิร์ฟเล็ตเป็นเหมือนโมดูลที่ต้องเขียนด้วยคำสั่ง ภาษาจาวา และคอมไฟล์เพื่อให้ได้เป็นโมดูล (โปรแกรมย่อย)มาก่อน ที่จะนำไปติดตั้งบนเว็บเซิร์ฟเวอร์ ส่วนเจเอสพี เป็นสคริปต์ ที่สามารถคอมไฟล์ และทำงานด้วยกลไลของเว็บ ความสะดวกและการนำไปใช้แตกต่างกันไปตามความเหมาะสม ผมได้รับเชิญให้ไปสอนในองค์กรแห่งหนึ่ง จึงเกิดเอกสารชุดนี้ขึ้นมา จริงๆแล้วตั้งใจจะเอาไปตีพิมพ์เป็นหนังสือ แต่ก็มีปัญหาเรื่องช่วงเวลาการออกจำหน่าย ซึ่งถือเป็นเหตุผลทางการตลาดกับสำนักพิมพ์ และเวลาก็ล่วงเลยมานาน เก็บไว้ในเครื่องคอมพิวเตอร์จนลืม (คิดดูซิว่านานขนาดไหน และลืมไปได้อย่างไร) ดังนั้นเพื่อไม่ให้เป็นแค่สิ่งที่อยู่ในคอมพิวเตอร์ เลยขออนุญาตินำมาเผยแพร่ ให้ไปดาวน์โหลด และให้ไปอ่านกันได้ฟรีๆเลยครับ ผิดถูกประการใดขอนอมรับไว้แต่ผู้เดียว หากนำไปใช้งานอ้างเครดิตมาให้ผมซักนิดก็ดีนะครับ ถึงผมจะไม่ได้ยินก็ตาม 555 อย่างน้อยสิ่งที่นำมาเผยแพร่ น่าจะเป็นประโยชน์ ต่อผู้ที่สนใจในเทคโนโลยีตัวนี้ และผมก็พิสูจน์มาแล้วในการนำมาพัฒนาระบบ gROOM ของหน่วยงานที่ทำอยู่ (ดู gROOM ) เชิญดาวน์โหลดได้ตามอัธยาศัยเลยนะครับ
บทที่ 1 การประมวลผลรูปแบบต่างๆบนระบบคอมพิวเตอร์
บทที่ 2 เวิร์ด ไวด์ เว็บ
บทที่ 3 HTML, CSS, XML
บทที่ 4 เตรียมสภาพแวดล้อมสำหรับการพัฒนาระบบ
บทที่ 5 Java Servlet เบื้องต้น
บทที่ 6 Handle Request and Response
บทที่ 7 Cookie and Session
บทที่ 8 JSP (Java Server Page)
บทที่ 9 Java Bean and Tag Libraries
บทที่ 10 การใช้งาน JSP ติดต่อกับระบบฐานข้อมูล
บทที่ 11-1 ร้านค้าออนไลน์ด้วยเทคโนยีจาวา ตอน 1
บทที่ 11-2 ร้านค้าออนไลน์ด้วยเทคโนโลยีจาวา ตอน 2
ปล. ในเอกสารเว็บไซต์ JavaCentrix.com และอีเมล์ถูกปิดไปนานแล้วนะครับ

Java Servlet

,

Java Servlet

From Wikipedia, the free encyclopedia
Jump to: navigation, search
Life of a JSP file.
A Servlet is a Java programming language class used to extend the capabilities of servers that can be accessed by a host application via a request-response programming model. Although servlets can respond to any type of request, they are commonly used to extend the applications hosted by web servers. Thus, it can be thought of as a Java Applet that runs on a server instead of a web browser.[1]

Contents

Introduction

A Servlet is a Java-based server-side web technology. As the name implies, it serves a client request and receives a response from the server. Technically speaking, a Servlet is a Java class in Java EE that conforms to the Java Servlet API, a protocol by which a Java class may respond to requests. They are not tied to a specific client–server protocol, but are most often used with the HTTP protocol. Therefore, the word "Servlet" is often used in the meaning of "HTTP Servlet".[2] Thus, a software developer may use a servlet to add dynamic content to a web server using the Java platform. The generated content is commonly HTML, but may be other data such as XML. Servlets are the Java counterpart to non-Java dynamic Web content technologies such as PHP and ASP.NET. Servlets can maintain state in session variables across many server transactions by using HTTP cookies, or URL rewriting.
To deploy and run a Servlet, a web container must be used. A web container (also known as a Servlet container) is essentially the component of a web server that interacts with the Servlets. The web container is responsible for managing the lifecycle of Servlets, mapping a URL to a particular Servlet and ensuring that the URL requester has the correct access rights.
The Servlet API, contained in the Java package hierarchy javax.servlet, defines the expected interactions of the web container and a servlet.[2]
A Servlet is an object that receives a request and generates a response based on that request. The basic Servlet package defines Java objects to represent Servlet requests and responses, as well as objects to reflect the Servlet's configuration parameters and execution environment. The package javax.servlet.http defines HTTP-specific subclasses of the generic servlet elements, including session management objects that track multiple requests and responses between the web server and a client. Servlets may be packaged in a WAR file as a web application.
Servlets can be generated automatically from JavaServer Pages (JSP) by the JavaServer Pages compiler. The difference between Servlets and JSP is that Servlets typically embed HTML inside Java code, while JSPs embed Java code in HTML. While the direct usage of Servlets to generate HTML (as shown in the example below) has become rare, the higher level MVC web framework in Java EE (JSF) still explicitly uses the Servlet technology for the low level request/response handling via the FacesServlet. A somewhat older usage is to use Servlets in conjunction with JSPs in a pattern called "Model 2", which is a flavor of the model–view–controller pattern..

History

The complete Servlet specification was created by Sun Microsystems, with version 1.0 finalized in June 1997. Starting with version 2.3, the Servlet specification was developed under the Java Community Process. JSR 53 defined both the Servlet 2.3 and JavaServer Page 1.2 specifications. JSR 154 specifies the Servlet 2.4 and 2.5 specifications. As of March 26, 2010, the current version of the Servlet specification is 3.0.
In his blog on java.net, Sun veteran and GlassFish lead Jim Driscoll details the history of Servlet technology. James Gosling first thought of Servlets in the early days of Java, but the concept did not become a product until Sun shipped the Java Web Server[clarify] product. This was before what is now the Java Platform, Enterprise Edition was made into a specification.
Servlet API history
Servlet API version Released Platform Important Changes
Servlet 3.0 December 2009 JavaEE 6, JavaSE 6 Pluggability, Ease of development, Async Servlet, Security, File Uploading
Servlet 2.5 September 2005 JavaEE 5, JavaSE 5 Requires JavaSE 5, supports annotation
Servlet 2.4 November 2003 J2EE 1.4, J2SE 1.3 web.xml uses XML Schema
Servlet 2.3 August 2001 J2EE 1.3, J2SE 1.2 Addition of Filter
Servlet 2.2 August 1999 J2EE 1.2, J2SE 1.2 Becomes part of J2EE, introduced independent web applications in .war files
Servlet 2.1 November 1998 Unspecified First official specification, added RequestDispatcher, ServletContext
Servlet 2.0
JDK 1.1 Part of Java Servlet Development Kit 2.0
Servlet 1.0 June 1997

Advantages over CGI

The advantages of using Servlets are their fast performance and ease of use combined with more power over traditional CGI (Common Gateway Interface). Traditional CGI scripts written in Java have a number of disadvantages when it comes to performance:
  • When an HTTP request is made, a new process is created for each call of the CGI script. This overhead of process creation can be very system-intensive, especially when the script does relatively fast operations. Thus, process creation will take more time than CGI script execution. Java Servlets solve this, as a Servlet is not a separate process. Each request to be handled by a Servlet is handled by a separate Java thread within the web server process, omitting separate process forking by the HTTP daemon.
  • Simultaneous CGI request causes the CGI script to be copied and loaded into memory as many times as there are requests. However, with Servlets, there are the same amount of threads as requests, but there will only be one copy of the Servlet class created in memory that stays there also between requests.
  • Only a single instance answers all requests concurrently. This reduces memory usage and makes the management of persistent data easy.
  • A Servlet can be run by a Servlet container in a restrictive environment, called a sandbox. This is similar to an applet that runs in the sandbox of the web browser. This makes a restrictive use of potentially harmful Servlets possible.[2]

Life cycle of a Servlet

  • During initialization stage of the Servlet life cycle, the web container initializes the Servlet instance by calling the init() method, passing an object implementing the ServletConfig interface. This configuration object allows the Servlet to access name-value initialization parameters from the web application.
  • After initialization, the Servlet can service client requests. Each request is serviced in its own separate thread. The web container calls the service() method of the Servlet for every request. The service() method determines the kind of request being made and dispatches it to an appropriate method to handle the request. The developer of the Servlet must provide an implementation for these methods. If a request for a method that is not implemented by the Servlet is made, the method of the parent class is called, typically resulting in an error being returned to the requester.
  • Finally, the web container calls the destroy() method that takes the Servlet out of service. The destroy() method, like init(), is called only once in the lifecycle of a Servlet.
Therefore, three methods are central to the life cycle of a Servlet. These are init(), service(), and destroy(). They are implemented by every Servlet and are invoked at specific times by the server. The following is a typical user scenario of these methods.
  1. Assume that a user enters a URL to a web browser.
    • The browser then generates an HTTP request for this URL.
    • This request is then sent to the appropriate server.
  2. The HTTP request is received by the web server and forwarded to the Servlet container.
    • The Servlet container maps this request to a particular Servlet.
    • The Servlet is dynamically retrieved and loaded into the address space of the Servlet container.
  3. The Servlet container invokes the init() method of the Servlet.
    • This method is invoked only when the Servlet is first loaded into memory.
    • It is possible to pass initialization parameters to the Servlet so it may configure itself.
  4. The Servlet container invokes the service() method of the Servlet.
    • This method is called to process the HTTP request.
    • You will see that it is possible for the Servlet to read data that has been provided in the HTTP request.
    • It may also formulate an HTTP response for the client.
  5. The Servlet remains in the Servlet container’s address space and is available to process any other HTTP requests received from clients.
    • The service() method is called for each HTTP request.
  6. The Servlet container may, at some point, decide to unload the Servlet from its memory.
    • The algorithms by which this decision is made are specific to each Servlet container.
  7. The Servlet container calls the Servlet's destroy() method to relinquish any resources such as file handles that are allocated for the Servlet; important data may be saved to a persistent store.
  8. The memory allocated for the Servlet and its objects can then be garbage collected.

Example

The following example Servlet prints how many times its service() method was called.
Note that HttpServlet is a subclass of GenericServlet, an implementation of the Servlet interface.
The service() method of HttpServlet class dispatches requests to the methods doGet(), doPost(), doPut(), doDelete(), and so on; according to the HTTP request. In the example below method service() is overridden and does not distinguish which HTTP request method it serves.
import java.io.IOException;
 
import javax.servlet.ServletConfig;
import javax.servlet.ServletException;
import javax.servlet.http.HttpServlet;
import javax.servlet.http.HttpServletRequest;
import javax.servlet.http.HttpServletResponse;
 
public class ServletLifeCycleExample extends HttpServlet {
 
    private int count;
 
    @Override
    public void init(ServletConfig config) throws ServletException {
        super.init(config);
        getServletContext().log("init() called");
        count=0;
    }
 
    @Override
    protected void service(HttpServletRequest request, HttpServletResponse response)
            throws ServletException, IOException {
        getServletContext().log("service() called");
        count++;
        response.getWriter().write("Incrementing the count: Count = "+count);
    }
 
    @Override
    public void destroy() {
        getServletContext().log("destroy() called");
    }   
 
}

Usage

Servlets are most often used to
  • process or store data that was submitted from an HTML form
  • provide dynamic content such as the results of a database query
  • manage state information that does not exist in the stateless HTTP protocol, such as filling the articles into the shopping cart of the appropriate customer.

See also

เล่นกับ Get Request และ Post Request ใน JSP

,
บทความนี้จะพูดถึงการรับส่งข้อมูลระหว่าง Page ใน JSP ด้วย get และ post
การส่งข้อมูลแบบ get จะสังเกตง่ายๆคือค่าของตัวแปรแปะมากับ URL ส่วนการ Post จะไม่เห็นรวมอยู่ใน Url เหมือนแต่จะนิยมใช้ในการส่งค่าผ่าน form
การรับส่งค่าแบบ GET

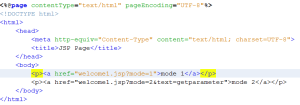
จากรูปจะเห็นได้ว่ามีการส่งข้อมูลไปยังหน้าเพจ welcome1.jsp ซึ่ง link แรก จำทำการส่งตัวแปร mode โดยตัวแปร mode เก็บค่า 1 และ link ที่สองทำการส่งค่าตัวแปร 2 ตัว คือ mode และ text

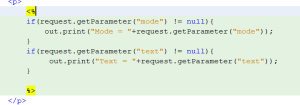
จากรูปข้างต้นเป็นการรับค่าแบบ get เพื่อนำมาใช้ใน code ซึ่งตัวอย่างจะใช้ request.getParameter(String ชื่อตัวแปร) ในการดึงค่าที่ถูกส่งมากับตัวแปรแบบ GET
การรับส่งค่าแบบ POST
การส่งข้อมูลแบบ POST จะไม่เห็นค่าและชื่อตัวแปรใน address bar ของ Browser ซึ่งนิยมใช้ในการส่งค่าผ่าน form ต่าง

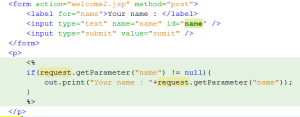
จากรูปเป็นการส่งข้อมูลแบบ Post และการรับข้อมูลแบบมาใช้งาน โดยจะสังเกตเห็นได้ว่าการดึงค่าจากตัวแปรที่ส่งมาใช้คำสั่งเดียวกันคือ request.getParameter(..);
ซึ่งทำให้สรุปง่ายว่าแม้ว่าจะส่งข้อมูลแบบ Post หรือ Get การดึงค่าในตัวแปรก็ไม่แตกต่างกัน
ปล.เนื้อหาในบทความนี้เป็นการจดบันทึกส่วนตัวของผมซึ่งปล่อยเป็นสถานะใคร ใช้วิจารณญาณในการอ่านนะครับ ถ้าส่วนไหนถูกผิดอย่างไรก็ขอคำแนะนติชมและชี้แนะด้วยนะครับ

Servlet คืออะไร ??

,
                 หลายคนอาจจะคุ้นหูคุ้นตากับ html php asp มากกว่า servlet เพราะส่วนมากแล้ว servlet นั้นจะไม่ค่อยได้แสดงตัวตนออกมาให้ผู้คนได้เห็นทางหน้าเว็บบราวเซอร์มากนัก
เนื่องจาก servlet นั้นจะทำงานในส่วนของ business logic ซะมากกว่า ถ้าเทียบกับ model MVC  servlet ก็จะเป็นส่วนของการ controller นั่นเอง
แล้วทำไมเราถึงต้องใช้ servlet กันล่ะ ? มันมีดีอะไร มาดูกัน…
เมื่อก่อนนั้น การทำงาน business logic นั้น เราจะใช้ CGI เป็นตัวที่คอยทำงาน แต่ทว่า หากเราใช้ CGI นั้น เมื่อมี request เข้ามามากกว่า 1 request cgi จะสร้าง process ขึ้นมาใหม่เสมอ
แล้วลองคิดดูว่า หากเป็นเว็บที่มีคนเข้าเป็นแสนเป็นล้านคน อย่าง google.com ถ้ายังใช้ cgi อยู่ จะเป็นอย่างไร คงต้องใช้ cpu 1024 core กันเลยทีเดียว
แต่เดี๋ยวก่อนเราทางเลือกใหม่มาเสนอด้วย…ab shaper เครื่องนี้  ไม่ใช่และ !!!
servlet !! เพราะ servlet นั้นจะทำงานด้วย thread ซึ่งจะถูกจัดการด้วย JVM และ webserver ทำให้ server สร้าง object ของ servlet เพียง object เดียว แต่ทุกๆ request เข้ามาใช้ร่วมกันได้
servlet

แล้วเราสามารถเอา servlet มาทำงานอะไรได้บ้าง ?  แน่นอน มันแสดง  html ได้แต่เราต้องพิม java code เองอะนะ ทำไปทำไม – -”  สู้เราเขียน html เอายังง่ายซะกว่า
ส่วนที่ servlet ทำส่วนใหญ่ ก็คือ controller ดังที่กล่าวมาแล้ว เช่น การติดต่อ database ,การจัดการ session  เพื่อให้ได้มาซึ่ง dynamic web นั่นเอง

Apache Tomcat คืออะไร

,

Apache Tomcat คืออะไร

Apache Tomcat เป็น web server ที่พัฒนาโดย Apache Group

Apache Tomcat เป็น software ประเภท open source ที่ถูกดำเนินการโดยเทคโนโลยี Java Servlet และ JavaServer Pages

Apache Tomcat เป็น web server ที่รองรับการทำงานของ jsp/servlet

Apache Tomcat ถูกใช้อย่างแพร่หลาย ในการพัฒนาเว็บแอพพลิเคชันโดย jsp/servlet

Apache Tomcat ได้พัฒนามาตั้งแต่ปี 1999

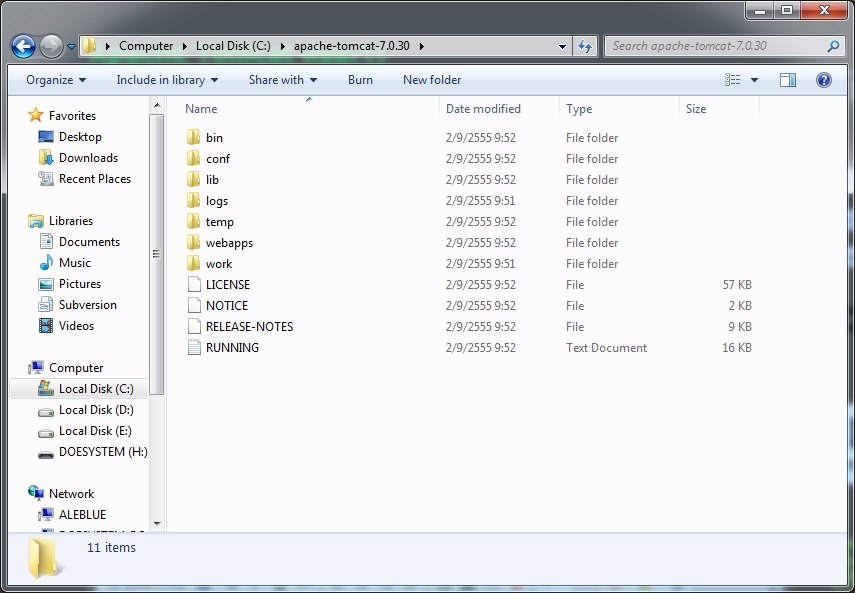
Apache Tomcat มีส่วนประกอบตามรูปด้านล่าง


- bin
โฟลเดอร์นี้จะใช้สำหรับ start/shutdown script และมีไฟล์ที่มีประโยชน์อื่น ๆ เช่น startup shutdown catalina

- conf
โฟลเดอร์นี้จะใช้สำหรับ ตั้งค่าต่าง ๆ ของโปรแกรม เช่น web.xml server.xml

- lib
โฟลเดอร์นี้จะใช้สำหรับ เก็บ Jar files ต่าง ๆ และใช้สำหรับ starting และ stopping Tomcat เช่น servlet-api.jar tomcat-api.jar

- logs
โฟลเดอร์นี้จะใช้สำหรับ เก็บ log files ต่าง ๆ

- webapps
โฟลเดอร์นี้จะใช้สำหรับ เก็บโปรเจ็คที่เราได้สร้างขึ้นมา

- work
โฟลเดอร์นี้จะใช้สำหรับ โปรแกรม เอาไว้วางไฟล์ intermediate files(เช่น compiled JSP files) ในระหว่างการทำงาน ซึ่งถ้าลบโฟลเดอร์นี้ออก ในระหว่างแปรโปรแกรมกำลังทำงาน จะไม่สามารถทำงานสคิป jsp ได้

Apache Tomcat สามารถดาวน์โหลดได้ฟรี ที่ http://tomcat.apache.org
 

Java Servlet Copyright © 2012 | Design by I Love Linux