Monday, December 24, 2012

Using PHP With Tomcat

,

Using PHP With Tomcat

This tutorial shows how to use PHP version 4 with Tomcat version 4 or later. The tutorial was originally written and sent to the tomcat-dev mailing list by Jean-Frederic Clere (on his vacation, no less ) and Henri Gomez.
PHP version 5 is not currently supported as it does not include the necessary servlet code.

Prerequisites

  • Download PHP (this tutorial uses PHP 4.3.5)
  • Download Tomcat (this tutorial uses Tomcat 5.0.19)
  • Define $JAVA_HOME for your JDK installation
  • Define $TOMCAT_HOME for your Tomcat installation
  • Define $PHP_HOME for your PHP installation

Patch for PHP configure Script

There is a patch required to compile PHP 4 to use Tomcat 5.
Prior to version 2.4 of Servlet Specification, the name of the servlet jar file was servlet.jar. In version 2.4 of the Servlet Specification, this name was changed to servlet-api.jar. Tomcat 4 uses the name servlet.jar, whereas Tomcat 5 and later uses servlet-api.jar. This causes problems with PHP's configure script.
This patch for PHP's configure script will fix this problem:
--- configure.org       2004-04-07 11:20:24.000000000 +0200
+++ configure   2004-04-07 11:22:50.000000000 +0200
      if test "$withval" = "yes"; then
        SERVLET_CLASSPATH=.
      else
+      if test -f $withval/common/lib/servlet-api.jar; then
+        SERVLET_CLASSPATH=$withval/common/lib/servlet-api.jar
+      fi
+
        if test -f $withval/lib/servlet.jar; then
          SERVLET_CLASSPATH=$withval/lib/servlet.jar
       fi

Patch for sapi/servlet/servlet.java

enum is now a reserved word with Java 5, thus causing servlet.java to break the make process.
--- servlet.java.orig   2005-09-26 22:25:55.000000000 -0400
+++ servlet.java        2005-09-26 22:26:11.000000000 -0400
@@ -63,12 +63,12 @@
     if (!request.getMethod().equals("POST")) {
       result = request.getQueryString();
     } else {
-      Enumeration enum = request.getParameterNames();
+      Enumeration xenum = request.getParameterNames();
       String concat = "";
       result = "";

-      while (enum.hasMoreElements()) {
-        String name  = (String)enum.nextElement();
+      while (xenum.hasMoreElements()) {
+        String name  = (String)xenum.nextElement();
         String value = request.getParameter(name);

         try {

PHP Installation

  • Extract the source code to PHP in a work directory
  • Patch if needed (that is, patch if building PHP to run with Tomcat version 5 or later)
  • Run configure, then make in the top directory of the PHP sources:
     ./configure --with-servlet=$TOMCAT_HOME --with-java=$JAVA_HOME
     make
  • A jar file and dynamic library are produced from the make: sapi/servlet/phpsrvlt.jar and libs/libphp4.so.
  • Copy the jar file to your web application's class repository, or, alternately, to Tomcat's common class repository (as is shown here):
     cp $PHP_HOME/sapi/servlet/phpsrvlt.jar $TOMCAT_HOME/common/lib
  • Declare PHP servlet and servlet-mapping in the web applications web.xml file, or in Tomcat's shared web.xml file:
    • Copy from $PHP_HOME/sapi/servlet/web.xml the servlet and servlet-mapping and paste into the file $TOMCAT_HOME/conf/web.xml.
  • Modify your LD_LIBRARY_PATH to include the dynamic library produced in the first step above:
     LD_LIBRARY_PATH=$PHP_HOME/libs
     export LD_LIBRARY_PATH
    • As an option, you can put libphp4.so someplace where java is already looking, any place in System.getProperty("java.library.path"), such as any of:
      /usr/lib/jdk1.5.0_04/jre/lib/i386/client:/usr/lib/jdk1.5.0_04/jre/lib/i386:/usr/lib/jdk1.5.0_04/jre/../lib/i386

Fedora Core 1 Issues with Tomcat 5.5.9, PHP 4.3.11 and jdk1.5.0_03

This may have just been an issue with the particular system I was building, but I was unable to set $JAVA_HOME, $PHP_HOME, $TOMCAT_HOME, or $LD_LIBRARY_PATH at the command line. The workaround was to edit /etc/profile and add the variables there (i.e., and the line  JAVA_HOME=/usr/java/jdk1.5.0_03 and add JAVA_HOME to the export variables).
  • If make returns an error where javac is not a recognized command, you'll need to patch the Makefile produced by ./configure. Look for "&& javac" and replace it with the full path to javac (i.e., " && /usr/java/jdk1.5.0_03/bin/javac").
  • If make returns an error regarding "enum" while trying to build phpsrvlt.jar, you'll need to edit $PHP_HOME/sapi/servlet/servlet.java and replace enum with xenum.

Start Tomcat

 $TOMCAT_HOME/bin/startup.sh.

Testing

Verify the following is in your webapp's web.xml (creates the servlet entries and maps .php to that servlet and mentioned in the PHP installation steps above):
    <servlet>
        <servlet-name>php</servlet-name>
        <servlet-class>net.php.servlet</servlet-class>
    </servlet>
    <servlet>
        <servlet-name>php-formatter</servlet-name>
        <servlet-class>net.php.formatter</servlet-class>
    </servlet>

    <servlet-mapping>
        <servlet-name>php</servlet-name>
        <url-pattern>*.php</url-pattern>
    </servlet-mapping>
    <servlet-mapping>
        <servlet-name>php-formatter</servlet-name>
        <url-pattern>*.phps</url-pattern>
    </servlet-mapping>
Verify that phpsrvlt.jar is in you WEB-INF/lib directory, or the tomcat common/lib directory (as mentioned above in the PHP installation steps)
Create a file named test.php in the docBase directory of your webapp.
In that file, simply put:
   <?php phpinfo(); ?>
Point your browser at the file by navigating to http://localhost:8080/test.php
If everything is working as it should, you will see an informational status page produced by PHP.

Sunday, December 23, 2012

การสร้าง Datasource บน Tomcat

,

การสร้าง Datasource บน Tomcat

โดยปกติเราสามารถสร้าง Web Application ที่สามารถติดต่อกับฐานข้อมูลได้โดยตรง แต่ในทางปฏิบัติเราควรจะติดต่อฐานข้อมูลผ่านทาง Data source แทน เนื่องจากมีข้อดีกว่าได้แก่
  • สามารถกำหนดจำนวนการติดต่อได้
  • สามารถสร้าง connection pool ทำให้ใช้งานระบบได้อย่างมีประสิทธิภาพ
  • สามารถกำหนดกลุ่มผู้ใช้งานฐานข้อมูลได
ในบทความนี้จะกล่าวถึงการ setup data source และกำหนด connection pool บน Tomcat version 5.5.x พร้องทั้งแสดงตัวอย่าง web application ที่เรียกใช้ฐานข้อมูลผ่านทาง data source ในที่นี้ผู้เขียนสมมติว่าผู้อ่านได้ติดตั้ง Tomcat แล้ว โดยติดตั้งที่ใดก็แล้วแต่ ซึ่งผู้เขียนขอเรียกว่า TomcatHome ดังนั้นถ้าผู้เขียนกล่าวถึง TomcatHome ขอให้ผู้อ่านรู้ว่ากำลังกล่าวถึงตำแหน่งที่ผู้อ่านได้ติดตั้ง Tomcat นั่นเอง
เริ่มแรกขอให้ไปที่ TomcatHome/conf ให้ทำการสำเนาไฟล์ server.xml เป็นชื่อ serverold.xml จากนั้นเปิดไฟล์ server.xml ขึ้นมา แล้วทำการแก้ไขข้อความภายในโดยเพิ่มข้อความระหว่าง tag <Host> และ </Host> ให้เป็นดังนี้
      <Host name="localhost" appBase="webapps"
       unpackWARs="true" autoDeploy="true"
       xmlValidation="false" xmlNamespaceAware="false">

 <Context path="/test" docBase="test"
        debug="5" reloadable="true" crossContext="true">

   <Resource name="jdbc/TestDB" auth="Container" type="javax.sql.DataSource"
               maxActive="100" maxIdle="30" maxWait="10000"
        removeAbandoned="true" removeAbandonedTimeout="60"
               username="root" password="" driverClassName="com.mysql.jdbc.Driver"
               url="jdbc:mysql://localhost:3306/your_database?autoReconnect=true"/>

 </Context>

      </Host>

ข้อความที่เพิ่มเข้ามาเป็นการสร้าง data source ที่ชื่อ jdbc/TestDB สำหรับ Application ที่อยู่ภายใน directory ชื่อ test ภายใต้ webapps ของ Tomcat ส่วนต่างๆมีความหมายดังนี้
maxActive เป็นการกำหนดจำนวนการติดต่อสูงสุดที่อนุญาตให้ใช้งานพร้อมกัน
maxIdle เป็นการกำหนดจำนวนสูงสุดของการติดต่อที่อยู่ในสภาวะ idle
maxWait เป็นการกำหนดเวลาสูงสุดที่รอการติดต่อ จากตัวอย่างข้างบนคือจะรอ 10 วินาที มิฉะนั้นก็จะแจ้งว่าเกิด timeout
removeAbandoned เป็นการกำหนดว่าถ้ามีการติดต่อใดอยู่ในสภาวะ idle นานเกินไปแล้วก็จะทำการยกเลิกการติดต่อออกไป
removeAbandonedTimeout เป็นการกำหนดเวลาที่จะพิจารณาในการยกเลิกการติดต่อ
จากตัวอย่าง ถ้ามีการ idle เป็นจำนวนเวลา 60 วินาที ก็จะถูกยกเลิกการติดต่อ เนื่องจากผู้เขียนใช้ฐานข้อมูลเป็น MySQL ดังนั้นจึงใช้ JDBC Driver และ URL ดังกล่าว
จากนั้นขอให้ผู้อ่านสร้าง directory ชื่อ test ภายใต้ webapps ของ TomcatHome โดยมีโครงสร้างดังนี้
 webapps
   |-----> test
  |------> test.jsp
  |------> WEB-INF
   |-----> web.xml
   |------> lib
    |-----> jstl.jar
    |-----> standard.jar

จากนั้นขอให้ผู้อ่านสำเนาไฟล์ ต่อไปนี้ไปไว้ใน TomcatHome/common/lib

  • Jakarta-Commons DBCP
  • Jakarta-Commons Collections
  • Jakarta-Commons Pool
  • JDBC Driver
ถ้าท่านใดไม่มีไฟล์ดังกล่าวข้างต้น สามารถดาวโหลดได้ ที่นี่ (ไม่รวม JDBC Driver)
ซึ่งผู้พัฒนาแนะนำว่าให้ติดตั้งไฟล์ดังกล่าวในที่นี้เท่านั้น โดยไม่แนะนำให้ติดตั้งใน WEB-INF/lib ซึ่งอาจเกิดปัญหาได้ จากนั้นให้แก้ไขไฟล์ web.xml ให้เป็นดังนี้
 <?xml version="1.0" encoding="ISO-8859-1"?>
 
 <web-app xmlns="http://java.sun.com/xml/ns/j2ee"
     xmlns:xsi="http://www.w3.org/2001/XMLSchema-instance"
     xsi:schemaLocation="http://java.sun.com/xml/ns/j2ee
 http://java.sun.com/xml/ns/j2ee/web-app_2_4.xsd"
     version="2.4">
   <description>MySQL Test App</description>
   <resource-ref>
       <description>DB Connection</description>
       <res-ref-name>jdbc/TestDB</res-ref-name>
       <res-type>javax.sql.DataSource</res-type>
       <res-auth>Container</res-auth>
   </resource-ref>
 </web-app>

ซึ่งเป็นการประกาศการนำ data source ที่เราได้สร้างแล้ว มาใช้ภายใน directory นี้นั่นเอง หลังจากนั้น เราสามารถสร้างโปรแกรมเพื่อทดสอบ data source ได้แล้ว โดยสร้างไฟล์ชื่อ test.jsp แล้วเพิ่มข้อความเข้าไปดังนี้ โดยขอให้แก้ไข sql query และชื่อ field ให้เหมาะสมกับตนเอง
 <%@ taglib uri="http://java.sun.com/jsp/jstl/sql" prefix="sql" %>
 <%@ taglib uri="http://java.sun.com/jsp/jstl/core" prefix="c" %>

 <sql:query var="rs" dataSource="jdbc/TestDB">
 select * from report
 </sql:query>
 <html>
   <head>
     <title>DB Test</title>
   </head>
   <body>
 
   <h2>Results</h2>
  
 <c:forEach var="row" items="${rs.rows}">
     ${row.product}   ${row.sell_amount}<br/>
 </c:forEach>
 
   </body>
 </html>

ซึ่งตัวอย่างนี้เป็นการเขียนโดยใช้ JSTL จากนั้นให้เรา start Tomcat แล้วเรียกโปรแกรมนี้ผ่าน Browser เช่น
http://localhost:8080/test/test.jsp

ก็จะได้ผลลัพธ์ตามต้องการ
สุดท้ายนี้หวังว่าบทความนี้คงเกิดประโยชน์แก่ท่านไม่มากก็น้อย หากมีข้อสงสัยใดสามารถสอบถามได้ที่เว็บบอร์ด

การเซ็ตอัพ JSP + MySQL5 บน Windows XP

,
จริงแล้วผู้เีีขียนไม่ได้ใช้งาน JSP ในการพัฒนาเว็บนะครับ แต่มีความจำเป็นบางอย่างที่จะต้องเซ็ตอัพเครื่องที่ใช้งานอยู่เป็นประจำซึ่ง เ็ป็น Windows XP (SP2) ให้สามารถใช้งาน JSP + MySQL5 ได้  ซึ่งก็ไม่แน่ใจเหมือนกันว่าจะถูกตามหลักการหรือเปล่า แต่พอเซ็ตอัพชึ้นมาแล้ว เป็นอันว่าสามารถใช้งานได้ครับ  ก็เลยได้บันทึกเอาไว้เ็ป็นบนความชุดนี้ครับ

เตรียมโปรแกรมที่จะต้องติดตั้ง
ซึ่งจะต้องมีโปรแกรมดังต่อไปนี้

  1. โปรแกรม MySQL เวอร์ชัน 5 ซึ่งของผู้เขียนเองได้ติดตั้งใช้งานกับ PHP ไว้ก่อนเแล้ว ซึ่งสามารถดาวน์โหลดได้จาก www.mysql.com
  2. โปรแกรม Apache Tomcat ซึ่งเป็น Servlet/JSP Container ที่ใช้งานสำหรับการพัฒนา Java Servlet และ JavaServer Pages ซึ่งในที่นี้ผู้เขียนใช้เวอร์ชัน 5.5.17 (apache-tomcat-5.5.17.exe) สามารถดาวน์โหลดได้จาก http://tomcat.apache.org/download-55.cgi โดยให้เลือกเป็น Binary Distributions --> Core --> Windows Executable โดยมีชื่อไฟล์เป็น apache-tomcat-5.5.17.exe
  3. โปรแกรม Java SE Development Kit (JDK) ซึ่งอาจเรียกว่า J2SE (Java 2 Platform Standard Edition) ซึ่งเวอร์ชันที่ผู้เขียนใช้เป็น JDK 5.0 Update 8 ที่ประกอบด้วย Java SE Delevolopment Kit (JDK) และ Java SE Runtime Environment (JRE) โดยสามารถดาวน์โหลดได้จาก http://java.sun.com/javase/downloads/index.jsp ซึ่งมีชื่อไฟล์เ็ป็น jdk-1_5_0_08-windows-i586-p.exe
  4. โปรแกรม MySQL Connector/J ซึ่งเป็น native Java driver ที่เปลี่ยน JDBC (Java Database Connectivity) calls ไปเ็ป็น Network Protocol ที่ถูกใช้โดย MySQL Database ซึ่งในที่นี้เป็น MySQL Connector/J 5.0 สามารถดาวน์โหลดได้จาก http://dev.mysql.com/downloads/connector/j/5.0.html โดยให้เลือกเป็น Source and Binaries (zip) ซึ่งมีชื่อไฟล์เป็น mysql-connector-java-5.0.3.zip
ติดตั้งโปรแกรม
  1. ติดตั้งโปรแกรม MySQL5 ซึ่งในที่นี้ผู้เขียนไม่ขอกล่าวถึงเนื่องจากของผู้เขียนได้ติดตั้งไว้ก่อนเรียบร้อยแล้ว
  2. ติดตั้งโปรแกรม Apache Tomcat เนื่องจากเป็น Windows Executable ก็สามารถติดตั้งได้ง่าย (Next ไปเรื่อย ๆ) ซึ่งเืมื่อติดตั้งเสร็จแล้วก็ไ่ม่ต้องปรับค่าใด ๆ
  3. ติดตั้งโปรแกรม JDK ซึ่งเป็น Windows Executable เช่นกัน การติดตั้งก็ใช้สไตล์ Next ไปเรื่อย ๆ เช่นกัน โดยเมื่อติดตั้งเสร็จแล้วจะีประกอบด้วย JDK และ JRE ซึ่งสามารถดูได้จาก Add and Remove Programs ดังรูป


  4. ติดตั้ง Driver ที่เป็น MySQL Connector/J 5.0 และคอนฟิก CLASSPATH ดังนี้
    1. แตกไฟล์ zip ที่ดาวน์โหลดมา แล้วทำการก็อปปี้ไฟล์ที่ชื่อ mysql-connector-java-5.0.3-bin.jar ไปไว้ที่ตำแหน่ง Library ของ Apache Tomcat (หรืออาจจะเป็นตำแหน่งอื่น) ซึ่งอยู่ที่ C:\Program Files\Apache Software Foundation\Tomcat 5.5\common\lib (สามารถดูข้อมูลเพิ่มเติมได้จาก http://dev.mysql.com/doc/refman/5.0/en/connector-j-installing-classpath.html)
    2. คอนฟิก CLASSPATH ด้วยการเซ็ตค่า environment variable ผ่าน System control panel ดังนี้:
      1. คลิ๊กเมาส์ขวาที่ไอคอน My Computer
      2. เลือกเมนู Properties
      3. เลือกแท็ป Avanced
      4. คลิ๊กปุ่ม Environment Variables
      5. ที่ System Variable ให้คลิ๊ิกปุ่ม New
      6. ป้อนค่า Variable name เป็น CLASSPATH และค่า่ Variable value ให้ชี้ไปยังไฟล์ mysql-connector-java-5.0.3-bin.jar ที่เราได้ทำการก็อปปี้ไปไว้ซึ่งในที่นี้คือ C:\Program Files\Apache Software Foundation\Tomcat 5.5\common\lib\mysql-connector-java-5.0.3-bin.jar ดังรูป

ทดสอบการใช้งาน JSP ให้ติดต่อ MySQL ผ่านเครื่องมือการสร้างเว็บที่เป็น Macromedia Dreamweaver
จากเอกสารของ mysql.com ได้แนะนำไว้ดังนี้ ครับ

If you are going to use the driver with the JDBC DriverManager, you would use com.mysql.jdbc.Driver as the class that implements java.sql.Driver.

ซึ่งค่า MySQL Driver ของ Macromedia Dreamweaver ที่เป็น Defalut จะเป็น  org.gjt.mm.mysql.Driver ซึ่งจากที่ผูเขียนทดลองใช้งานก็สามารถที่จะเชื่อม ต่อเพื่อดูข้อมูลจาก MySQL ได้   แต่การเชื่อมต่อผ่าน JSP Script ในบางกรณีรู้สึกว่าจะไม่ได้  ซึ่งจะขึ้นอยู่กับว่า ค่าของ Dreamweaver Shold Connect : เป็น Using Driver ON Testing Server หรือ Using Driver On This Machine

และเมื่อผู้เขียนได้ทดสอบเชื่อมต่อฐานข้อมูล MySQL ที่ชื่อ mit0401 ที่รันอยู่บน localhost ก็สามารถเชื่อมต่อได้สำเร็จดังรูป และสามารถ View Data ได้


และเมื่อทำการสร้าง JSP Script ให้เชื่อมต่อ MySQL เพื่อดูข้อมูลผ่านเมนู Insert --> Application Objects --> Dynamic Data --> Dynamic Talble ก็สามารถดูข้อมูลได้ดังรูป

Monday, December 3, 2012

Servlet Concurrency

,
A Java servlet container / web server is typically multithreaded. That means, that multiple requests to the same servlet may be executed at the same time. Therefore, you need to take concurrency into consideration when you implement your servlet.
I am not going to describe Java concurrency in great detail here. If you are interested in this topic, read my tutorial on Java Concurrency.
To make sure that a servlet is thread safe, there are a few basic rules of thumb you must follow:
  1. Your servlet service() method should not access any member variables, unless these member variables are thread safe themselves.
  2. Your servlet service() should not reassign member variables, as this may affect other threads executing inside the service() method. If you really, really need to reassign a member variable, make sure this is done inside a synchronized block.
  3. Rule 1 and 2 also counts for static variables.
  4. Local variables are always thread safe. Keep in mind though, that the object a local variable points to, may not be so. If the object was instantiated inside the method, and never escapes, there will be no problem. On the other hand, a local variable pointing to some shared object, may still cause problems. Just because you assign a shared object to a local reference, does not mean that object automatically becomes thread safe.
The request and response objects are of course thread safe to use. A new instance of these are created for every request into your servlet, and thus for every thread executing in your servlet.
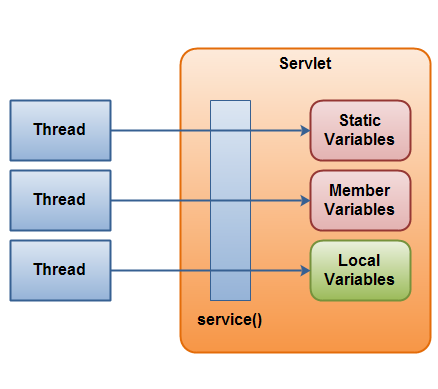
Here is a diagram which illustrates the servlet concurrency rules / issues mentioned above. The red boxes represent state (variables) that your servlet's service() method should be careful about accessing.
Java Servlet Concurrency Rules
Java Servlet Concurrency Rules.

Other Shared Resources

Of course it is not only the member variables and static variables inside the servlet class itself, that you need to be careful about accessing. Static variables in any other class which are accessed by your servlet, must also be thread safe. The same is true for member variables of any shread objects accessed by your servlet.

Code Example

Here is a code example that shows you some of the rules I have been talking about in this text.
public class SimpleHttpServlet extends HttpServlet {

  // Not thread safe, static.
  protected static List list = new ArrayList();

  // Not thread safe
  protected Map map = new HashMap();

  // Thread safe to access object, not thread safe to reassign variable.
  protected Map map = new ConcurrentHashMap();

  // Thread safe to access object (immutable), not thread safe to reassign variable.
  protected String aString = "a string value";


  protected void doGet( HttpServletRequest request,
                        HttpServletResponse response)
        throws ServletException, IOException {


    // Not thread safe, unless the singleton is 100% thread safe.
    SomeClass.getSomeStaticSingleton();


    // Thread safe, locally instantiated, and never escapes method.
    Set set = new HashSet();

  }
}


XmlBlaster provides a framework to callback browsers (push mode) using a never closing HTTP connection.

,

What is this?

When distributing dynamic, event driven content over the internet, you usually choose an applet. The applet connects to the server over CORBA (or any other protocol) and may receive instant notification from the server. But applets produce some well known problems like higher download time, firewalls which won't allow TCP/IP connections, applet-javascript communication problems with some Java-VM's etc. Note however that our requirement client.java.applet solves most of those problems.
This framework addresses these issues. It establishes a persistent http connection to allow instant callbacks of xmlBlaster messages to the browser.
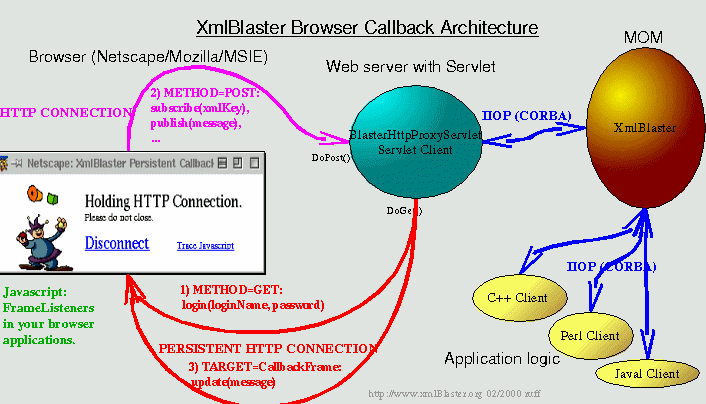
The browser callback framework is based on Java Servlets and some Javascript code. The Java Servlet BlasterHttpProxyServlet.java keeps a permanent HTTP connection to the browser and a CORBA connection to xmlBlaster.

Features

  • Complete object oriented xmlBlaster access in the browser with Javascript, see callback.js
  • The Javascript files callback.js and util.js provide the functionality on the browser side, xparse.js allows to parse the xml messages in the browser.
  • Very frequent message updates break the browsers, therefor the servlets automatically queues messages until the browser is ready again.
  • The callBackFrame queues messages until the frames processed them.
  • The callBackFrame is an own window, to avoid window resize problems of your application windows, and to avoid a 'waiting' cursor.
  • The http connection is pinged automatically with small but big enough dummy data, so that the connection does not close.
  • The browser responses on a ping with a 'pong', notifying the servlet that it is alive.
  • The browser Javascript code is traceable with the Log Javascript class in util.js
If you are logged in with your browser already and want in a later stage start the persistent connection, you can pass the login name and password using one of the following ways:
1. Variant: Passing infos using the URL (index.html example see below):
   document.location.href = "index.html?ActionType=login" +
                              "&xmlBlaster.loginName=" + myLoginName +
                              "&xmlBlaster.passwd=" + myPassword +
                              "&xmlBlaster.invalidate=false");
   // xmlBlaster will read these variables and use them to login to xmlBlaster.

2. Variant: Passing infos in a servlet with the session object:
   // prevent BlasterHttpProxyServlet from creating a new session ID:
   session.putValue("xmlBlaster.invalidate", "false");
   session.putValue("xmlBlaster.loginName", myLoginName);
   session.putValue("xmlBlaster.passwd", myPassword);
   response.sendRedirect("/index.html");  // index.html example see below
   // xmlBlaster will read these variables and use them to login to xmlBlaster.
      

How does it work?

A callback frame in the browser refers to the BlasterHttpProxyServlet. Using the ActionType parameter set to login, the BrowserHttpProxyServlet holds the HTTP connection if login to the xmlBlaster succeeds.
This permanent HTTP connection is held by the HttpPushHandler, which pings each 40 sec the browser. This functionality ensures that the browser won't close the connection.
The ProxyConnection connects to xmlBlaster using CORBA or any other supported protocol.
The messages from the xmlBlaster are directly (ProxyConnection.update - HttpPushHandler.update) transferred to the browser, which has a Javascript based XML parser and notifies the interested browser frames about the callback.
You can provide as many own frames as you wish. This is the work which is left for you to design your web layout.
If you have too many messages in a short time frame, your browser won't process all of this message. For this you can use an additional ready frame. Connect this frame also with the BlasterHttpProxyServlet using ActionType=browserReady. Each reload of this frame indicates your permanent HTTP connection (HttpPushHandler) that your browser is ready to process more messages. HttpPushHandler will send you the whole queue each update.
The hidden callback frame is always necessary to handle the communication, in your parent frame you have to include callback.js, util.js and xparse.js.
For Servlet and Javascript examples have a look into the following directory of the xmlBlaster distribution:
xmlBlaster/src/java/org/xmlBlaster/protocol/http

How to instrument your Java EE applications for a virtualized environment

,
If you're excited about the automation capabilities of cloud computing and virtualization, you are going to love this solution. In a virtualized environment where applications can ostensibly be popping up all over, and applications are no longer tied to specific servers, there is a need to automatically manage these application instances in a high-availability (load balanced) environment. What you need is the ability to automagically add and remove application instances from the application delivery controller (load balancer) so you don't have to worry about tying those applications down, which could reduce the benefits typically associated with virtualization.
If you aren't going to a fully virtualized and automated data center, you might be happy to know that you can still reap the benefits of this automated solution. Not only is this solution perfect for a virtualized environment, it's also just as great for a non-virtualized environment for automating availability of applications. Truth be told, the application and the solution doesn't care (nor should it) whether it's running in a virtual image or not; it merely "is".
In a nutshell, when an application initializes, it adds itself to the appropriate application pool on the application delivery controller. When the application is destroyed, it removes itself. This means no matter where the application instance is living - in a virtual image, in a different servlet container, on a new server - it will automatically be "discovered" and immediately become part of the high availability pool of servers.
iControl, F5's service-enabled API providing configuration and management control of its solutions, can be used from within your Java EE application to enable automation of pool management on a BIG-IP application delivery controller.
java This solution uses the Java Servlet 2.3 ServletContextListener interface. The ServletContextListener interface can be used to listen and react to a variety of servlet events, including application lifecycle. In order to automate the addition and removal of an application from the appropriate BIG-IP pool, we'll be listening for two events: contextInitialized and contextDestroyed. In the former, we'll add the application to the appropriate pool and in the latter, we'll remove it automatically.
This proactive approach to managing applications managed by BIG-IP LTM (Local Traffic Manager) also ensures that requests are not caught in between a monitor's health check interval, which can result in either an error or a second connection as part of a retry event within an iRule. This improves performance by ensuring that only active applications receive requests, and reduces connection attempts that can improve the efficiency of high-volume applications.
This is also an excellent method of automating availability for applications for which synthetic monitors are problematic. 
You can read about the full solution with code in this article. Yes, they actually let me code from time to time.
Happy coding!
 

Java Servlet Copyright © 2012 | Design by I Love Linux